

Database Security
In this article we will cover the security aspect in regards to databases as per CIS benchmarks (CIS Benchmarks are globally recognized, consensus-driven security configuration best practices developed by the Center for Internet Security (CIS)).
So lets start this:
Operating System Level Configuration
Keep your database files off the system partition (/, /var, /usr). Why? Because if MySQL fills up the disk, it doesn't just take down MySQL — it takes down systemd, logging, SSH, everything that needs to write to /. That's a denial-of-service waiting to happen.
Put the data on its own partition and always a dedicated server for database which is in private or internal subnet and can only be accessed by applications or services that need to or authorized to communicate with it, and a runaway table or binlog only kills the thing it should kill. Blast radius contained.

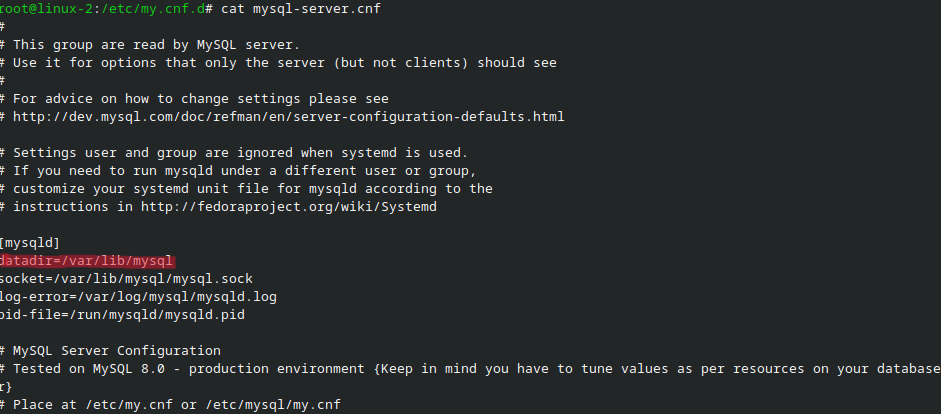
As you can see that it is default location so it is on the root / volume we will change it.
First we take backup of our DB.

As you can see the backup has been taken now

Cant create a logical volume on my VM since It is part of my homelab and my disk almost free will cover the volumes part in separate linux series.
sudo systemctl stop mysql                # Stop the Mysql Service
pgrep -a mysqld                          # should be empty
sudo cp -rp /var/lib/mysql /data/mysql   # Copy the files from the default dir
sudo chown -R mysql:mysql /data/mysql    # Change ownership of the dirs in new vol
sudo chmod 750 /data/mysql               # Assign permissions (user=rwx,group=rx,others=---)
After this step you have to make the mysql process read the new data dir by modifying its configuration file
After this you may have to manage the Selinux contexts for the new volume for security if using a rhel based distro.
1. Use a Dedicated Least Privileged Account
Now we're tackling something that is absolutely foundational in Linux security: making sure the database service doesn't run as root.
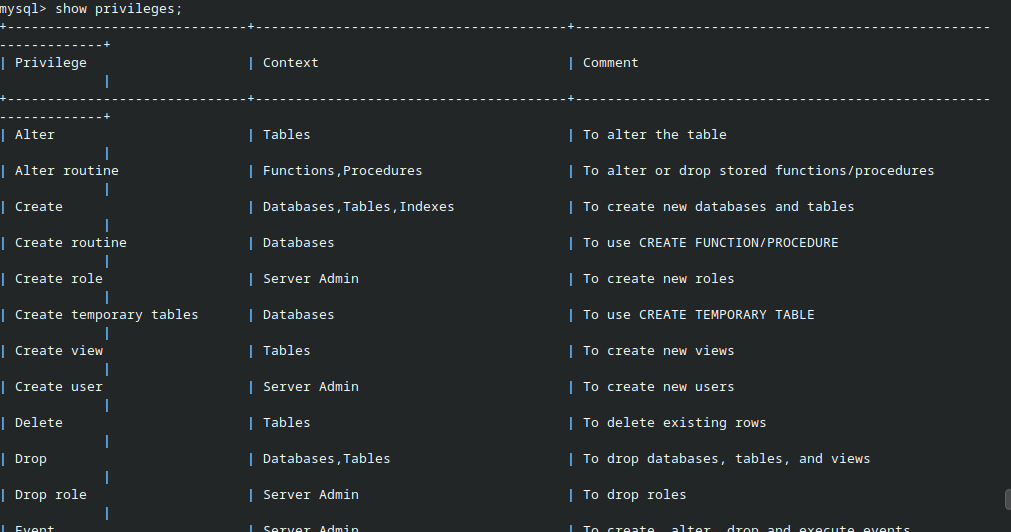
MySQL has serveral privileges make sure you give them according to user's authorized access and not grant them unecessary privileges:
Imagine an attacker finds a SQL injection vulnerability in your app that allows them to write files. If MySQL is running as root, they just wrote a web shell to /var/www/html/ and owned your entire server. If MySQL is running as the mysql user with no shell access, they are trapped in a sandbox. That's the blast-radius reduction we want:
Lets check on my server:

So the first check is passed as you can see the user of mysqld process is the mysql user.
we will run the following command to see if the user has access to interactive shell or not:
sudo grep '^mysql:' /etc/passwd
The shell is locked down (/sbin/nologin). If a hacker exploits a bug in the database and tries to drop into a command prompt, the OS will instantly kick them out.

Or you can use mysql builtin plugin to make a user with nologin. You can use the following commands for that:
CREATE USER 'proddbuser'@'localhost' IDENTIFIED WITH mysql_no_login;
GRANT ALL PRIVILEGES ON my_database.* TO 'proddbhost'@'localhost';
2. Disable Command History
Every time you type a command into the MySQL shell, the client secretly writes it down in a hidden file in your home directory (~/.mysql_history). Why is this a problem? Because DBAs are human, and humans type things like:
CREATE USER 'admin'@'localhost' IDENTIFIED BY 'SuperSecretPassword123!';
Congratulations, you just wrote your admin password in plaintext to a file on the disk. If an attacker gets local access to the OS, they are absolutely going to run cat /root/.mysql_history to see what you've been up to.
The fix is to simply redirect this history file to /dev/null (the Linux black hole) so it never gets saved.
But latest versions of mysql have this feature builtin.
3. Stop Using MYSQL_PWD
You can pass a password to the MySQL client like this:export MYSQL_PWD="SuperSecretPassword"; mysql -u root
It’s incredibly convenient for scripts because you don't have to deal with interactive prompts. But as a security engineer, I hate it. Why? Because any user on the system who can read your process environment can steal the password.
On Linux, environment variables are exposed in /proc/<PID>/environ. If a backup script runs with MYSQL_PWD, or if you leave it set in your SSH session, an attacker who gets a low-privileged shell can just read it. It's plaintext credential exposure.
Which is also the built in security feature already handled by mysql:

I ran the CIS audit command (grep MYSQL_PWD /proc/*/environ) and a secondary check using ps eww -u mysql. Both returned clean. The MySQL daemon is not leaking plaintext credentials in its environment, and no active scripts are using it.
BACKUP AND DISASTER RECOVERY:
1 . Regular Backups:
We need to have database backups consistently for disaster recovery and incident response this can be done using crontab (I do this) or one of the following methods:
- For enterprise workloads, pgBackRest delivers reliable physical and Write-Ahead Log (WAL) backups with encryption, compression, and fast delta restores.
- If you are pushing archives directly to cloud storage like AWS S3 or Google Cloud, WAL-G offers ultra-low latency.
- For smaller datasets or granular table recovery, PostgreSQL's built-in pg_dump and pg_restore utilities remain simple and effective.
- Percona XtraBackup is the open-source industry standard for non-blocking "hot" backups on InnoDB, letting you capture incremental changes and recover quickly without taking your database offline.
- For smaller transactional databases, standard logical tools like mysqldump and mysqlpump get the job done easily with bash scripting and cron.
- For Windows-based SQL environments, third-party automation and snapshot platforms like Veeam can help in managing
.bakfiles for automated schedules.
2. Secure Your Backups
After we successfully configure and run our backups, the next critical step is securing them. Think about what a database backup actually is: it’s a complete, consolidated copy of your entire database—every table, every schema, every password hash, and every piece of sensitive customer data, all sitting in one place.
If a backup file gets compromised, the attacker essentially has the keys to the kingdom. They can exfiltrate the data, or worse, hold it for ransom. Even if they don't get your live server, they still have your data.
Now, here is a frustrating reality: you absolutely cannot give non-interactive access to a backup user if you are automating things via cron or using CLI-based tools like WAL-G, mysqldump, or pg_basebackup.
Why? Because automation requires the script to run without a human typing a password. To make this work, people usually hardcode credentials into a script or a plain-text .my.cnf file. If an attacker gets into your server, the first thing they will look for is your backup script—because they know it holds the master password to dump the entire database.
So, how do we solve this? We have to separate the creation of the backup from the storage of the backup, and we have to lock it down with both strict file permissions and strong encryption.
- Lock Down the Directory Never store backups in /tmp or /home. The backup directory itself should be owned by root (or a dedicated, locked-down backup account) and restricted with chmod 700. This ensures no other user on the OS can even see the files, let alone read them.
- Encrypt at Rest (and in Transit) Even with 700 permissions, if an attacker gets root, they get the backup. You must encrypt the backup stream. Using OpenSSL or GPG, we can pipe the output of mysqldump directly into an encryption engine. This way, the backup is encrypted before it ever hits the disk.
- We can and should also backup configuration files and SSL files.
3. Point-in-Time Recovery (PITR)
Lets take an example that your write a cron script or schedule your backups at midnight 12:00 now what if a hardworking developer decides to work on his task late at night 3:00 AM and meanwhile in this process he out of an error copy pastes a mysql query which deletes the table users.
Now of course the first thing would be to restore the backup of 12:00 AM right.
WRONG
Because what about the users that were created after midnight thats where the binlog comes in:
Binlog: The "Archive" at the Server Level
Binlog belongs to the MySQL Server level, not the InnoDB engine level. Regardless of which storage engine you use, as long as binlog is enabled, MySQL records writes.
- Logical log: It records specific SQL statements (like
UPDATE users SET ...) or row-level changes, used for replication and point-in-time recovery (PITR) .- It and the redo log coordinate through two-phase commit to ensure that the binlog and the actual data remain consistent after a crash.
You will first restore the latest backup then:
4. Recovery (PITR) Using Binlogs
Step 1: Find the "Disaster" Position in the Binlog
Suppose you know the accidental deletion happened around 2026-xx-xx 03:00:00. We need to find the exact byte position of that bad DELETE command in the binlog.
Use the mysqlbinlog tool to inspect the log content around that timeframe. We use grep -C 15 to show 15 lines of context before and after the keyword:
mysqlbinlog --start-datetime="2026-xx-xx 12:00:00" \
            --stop-datetime="2026-xx-xx 02:59:00" \
            --verbose /var/lib/mysql/binlog.000012 | grep -C 15 "DELETE"
In the output, you will see a line that looks like # at 232 right before the bad statement. This is the position where we must stop the replay.
Note: We use
--start-datetimeand--stop-datetimeonly for locating the event. It is highly recommended not to use timestamps for the actual replay, because overlapping events or clock drifts can cause you to miss transactions. Always use exact positions.
Step 3: Execute the Replay
Now we bring the database back to life. We will pipe the binlog into the MySQL client using --start-position (where the backup ended) and --stop-position (where the disaster began).
PITR is a superpower, but it requires binary logging to be enabled and binlogs to be backed up offsite. First set log_bin = ON and binlog_expire_logs_seconds to a safe number in the cnf file.
Identity and Access Management (IAM)
1. Password Expiration, Lockouts, and Socket Auth
Why it matters: Password expiration forces users to change their credentials periodically, limiting the window of opportunity if an account is compromised (e.g., through a data breach at a third-party site).
In MySQL, the global variable is default_password_lifetime. Run this query:

- The value is
> 0but<= 365(e.g.,365means passwords expire in 1 year). - The value is
0(never expires) or greater than365(Wrong move).
You can set this globally at runtime, but it's safer to put it in the config file so it survives a reboot.
Add under [mysqld] section:
default_password_lifetime=365
Restart MySQL, or run the SQL command: SET GLOBAL default_password_lifetime=365;
To enforce it on a specific user (overriding the global default):
ALTER USER 'app_user'@'localhost' PASSWORD EXPIRE INTERVAL 365 DAY;
2. Lock Out Accounts if Not Currently in Use
Why it matters: Dormant, unused accounts are a massive security risk. They often have outdated passwords and aren't monitored. If an attacker finds a dormant admin account, they can use it without raising suspicion.
To see which accounts are locked:
SELECT User, Host, account_locked
FROM mysql.user
WHERE account_locked = 'Y';
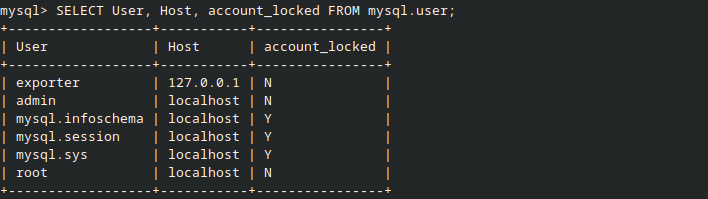
If you find stale accounts or users that need temporary suspension, lock them so they cannot authenticate. Do not delete them until you are absolutely sure they aren't needed (to preserve their grant history).
-- To lock an account:
ALTER USER 'demo'@'localhost' ACCOUNT LOCK;

-- To unlock an account:
ALTER USER 'demo'@'localhost' ACCOUNT UNLOCK;
Security Tip: It is a best practice to immediately LOCK an account when you create it ahead of time, and only UNLOCK it once the user is ready to start.
Ensure Socket Peer-Credential Authentication is Used Appropriately (Manual)
Why it matters: The unix_socket authentication plugin allows local users to log in to MySQL using their Linux OS username—without typing a MySQL password. It checks the OS credentials and grants access.
This is fantastic for DBAs because it eliminates plaintext passwords (like MYSQL_PWD) and relies on the OS security model. However, if an attacker gets root OS access, they automatically get root MySQL access.
First, check if the plugin is active:
SELECT PLUGIN_NAME, PLUGIN_STATUS
FROM INFORMATION_SCHEMA.PLUGINS
WHERE PLUGIN_NAME = 'auth_socket';
To see which MySQL users are using socket authentication:
SELECT User, Host, plugin
FROM mysql.user
WHERE plugin = 'auth_socket';
- The Pass/Fail: If your organization mandates passwords for all DB logins, and this plugin is active, it’s a FAIL. If you are using this for local DBA logins to harden the server, it is a PASS (provided the
Hostis restricted tolocalhost).
2. Bound to Specific IP Addresses
By default, MySQL/MariaDB listens on 0.0.0.0 (all IPv4 interfaces) or :: (all IPv6 interfaces). This means your database is accepting TCP connections on every network card plugged into the server—including public-facing ones.
As a security engineer, if a database is listening on a public IP, it's only a matter of time before bots find it and start brute-forcing your root password. By binding the database to a specific, private IP address (like your internal LAN or VPC IP), you limit the attack surface. The database can only be reached if a client is explicitly routing traffic to that specific interface.
The CIS benchmark says it perfectly: "Limiting the IP addresses provides additional controls and restrictions on how client applications can connect."
How to check
Run this query:
SELECT VARIABLE_NAME, VARIABLE_VALUE
FROM performance_schema.global_variables
WHERE VARIABLE_NAME = 'bind_address';
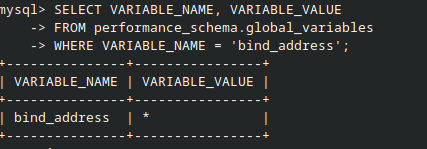
The Pass/Fail:
- The value is a specific IP (e.g.,
127.0.0.1,192.168.1.50, or a comma-separated list of private IPs). - The value is empty,
*,0.0.0.0, or::(Wrong).
To see exactly what your server is listening on right now at the OS level, run:
ss -tulpn | grep mysqld
If you see 0.0.0.0:3306 or [::]:3306, you are listening to the world. That's a fail.
3. The Cloud / Private Interface Rule
If your server has multiple network interfaces (for example, one private IP for application traffic, and one public IP because you're on a cloud provider), you must bind to the private interface.
If you have an on-prem replication setup over a VPN and a public IP, you might bind to both the private IP and the public IP, but only if the firewall restricts access to that public IP. In 99% of cases, you only want to bind to the private IP or localhost.
Applying the Configuration
- Open your MySQL config file:
sudo vi /etc/my.cnf.d/mysql-server.cnf
(On Ubuntu, this might be /etc/mysql/mysql.conf.d/mysqld.cnf)
- Find the
[mysqld]section and add/change thebind_addressline.
Scenario A: Localhost only (Application and DB on the same server)
bind_address=127.0.0.1
Scenario B: Specific private IP (Application on a different server) Find your private IP using ip a (e.g., 192.168.1.50 or AWS private IP):
bind_address=192.168.1.50
Scenario C: Multiple specific IPs (Comma-separated)
bind_address=192.168.1.50,10.0.0.5
After this you can restart mysql service so that it can load the configuration file again.
Hardening TLS and Encryption
1. Limit Accepted TLS Versions
TLS 1.0 and 1.1 are ancient. They have known vulnerabilities (like BEAST and POODLE) and are officially deprecated by every security standard (PCI-DSS, NIST, etc.). If your server accepts them, an attacker might force a downgrade attack. We want to strictly enforce TLS 1.2 and 1.3.
By default mysql now uses tlsv1.2 and v1.3
SHOW VARIABLES LIKE 'tls_version';

tls_version=TLSv1.2,TLSv1.3
2. Require Client-Side Certificates (X.509)
Normally, when you connect to MySQL over TLS, the server proves its identity to the client. But what if we want to prove the client's identity? X.509 client certificates act as a second factor. The server will refuse the connection unless the client presents a valid, signed certificate.
Run this to see who requires a certificate:
SELECT user, host, ssl_type
FROM mysql.user
WHERE user NOT IN ('mysql.sys', 'mysql.session', 'mysql.infoschema', 'root');
The Pass: The ssl_type column shows X509 for your application users. The Fail: The ssl_type is empty (meaning passwords alone are enough).
We will work on this implementation on a separate blog article.
3. Ensure Only Approved Ciphers are Used
TLS versions are the protocol; Ciphers are the actual math used to scramble the data. Some ciphers are weak (like RC4 or 3DES) and can be cracked. We want to restrict MySQL to only use modern, strong ciphers (specifically AES-GCM or ChaCha20).
SHOW VARIABLES LIKE 'ssl_cipher';
The Pass: The value is a specific, strong cipher suite (e.g., ECDHE-ECDSA-AES128-GCM-SHA256). The Fail: The value is empty (allows any cipher the OS supports, including weak ones).
Open your config file:
sudo vi /etc/my.cnf.d/mysql-server.cnf
Add under [mysqld] (this is a common, highly secure cipher string) This works only if you have configured tls/ssl certificates:
ssl_cipher=ECDHE-ECDSA-AES256-GCM-SHA384:ECDHE-RSA-AES256-GCM-SHA384:ECDHE-ECDSA-AES128-GCM-SHA256:ECDHE-RSA-AES128-GCM-SHA256
The checklist is done, but the takeaway isn't "I hardened MySQL." It's that every item above was a blast-radius decision: the data dir on its own volume so a full disk doesn't take down sshd; the
mysqluser with/sbin/nologinso a SQLi file-write lands in a sandbox;bind_addresson the private NIC so bots never see port 3306; encrypted backups in achmod 700root-owned dir so a compromise doesn't hand over the whole dataset. None of these stop a determined attacker alone — together they turn "own the server" into "own one thing, slowly, and get logged.
Comments
Join the discussionNo comments yet. Be the first to comment.